
Redtail CRM offers subscribers a ton of opportunities to customize their CRM, both at the individual and at the database level. These opportunities for customization are important because they allow you to set your database preferences and lists up in ways that work the best for both you as an individual as well as for your office. Taken together, these customization options will help drive user adoption and, ultimately, help you streamline your processes while at the same time personalize and improve the client experience your firm provides.
The CRM preferences we’ll consider in this post fall under the category of “Contact Record”.
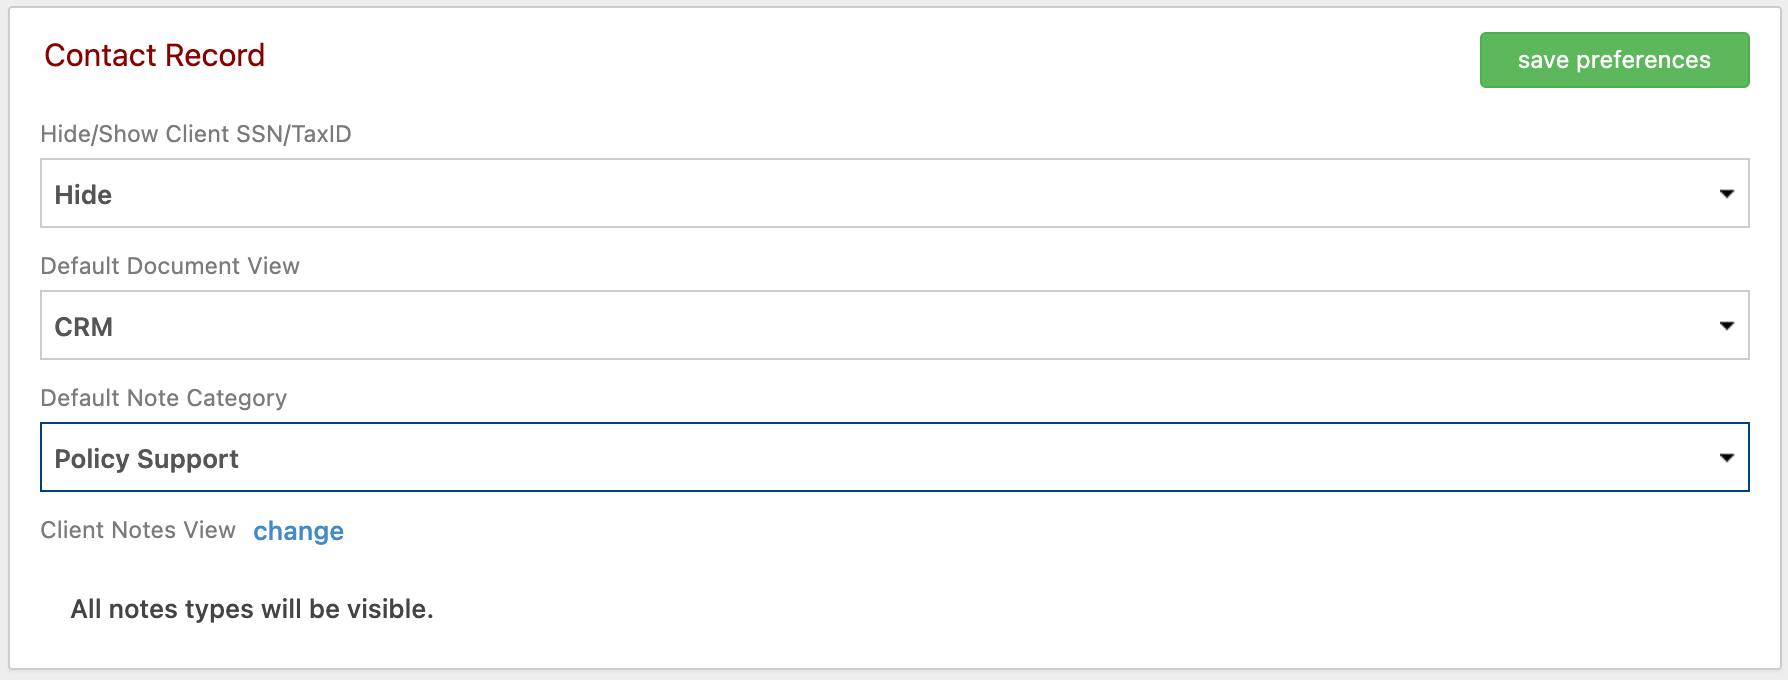
Your Contact Record preferences can be accessed and updated from your Preferences page:
Below, we’ll take a look at each of these Contact Record preferences and how you might customize them. Note: these options are user-specific, and will take effect in your database only under your login credentials.
When actually visiting a contact’s record, you can override any of these default preferences for that individual session. But, unless you actually change a Preference in this area, it will control what is displayed in a contact’s record by default for each session.
Hide/Show Client SSN/TaxID
You have a simple choice here: when you’re visiting’s a client’s record you can set this preference to “Show” a client’s full SSN in their Contact Details or you can set it to “Hide” all but the last four digits of that SSN by default. You’ll see our preference above is set to “Hide”, so when we visit Contact Details for a client it might look something like the below:
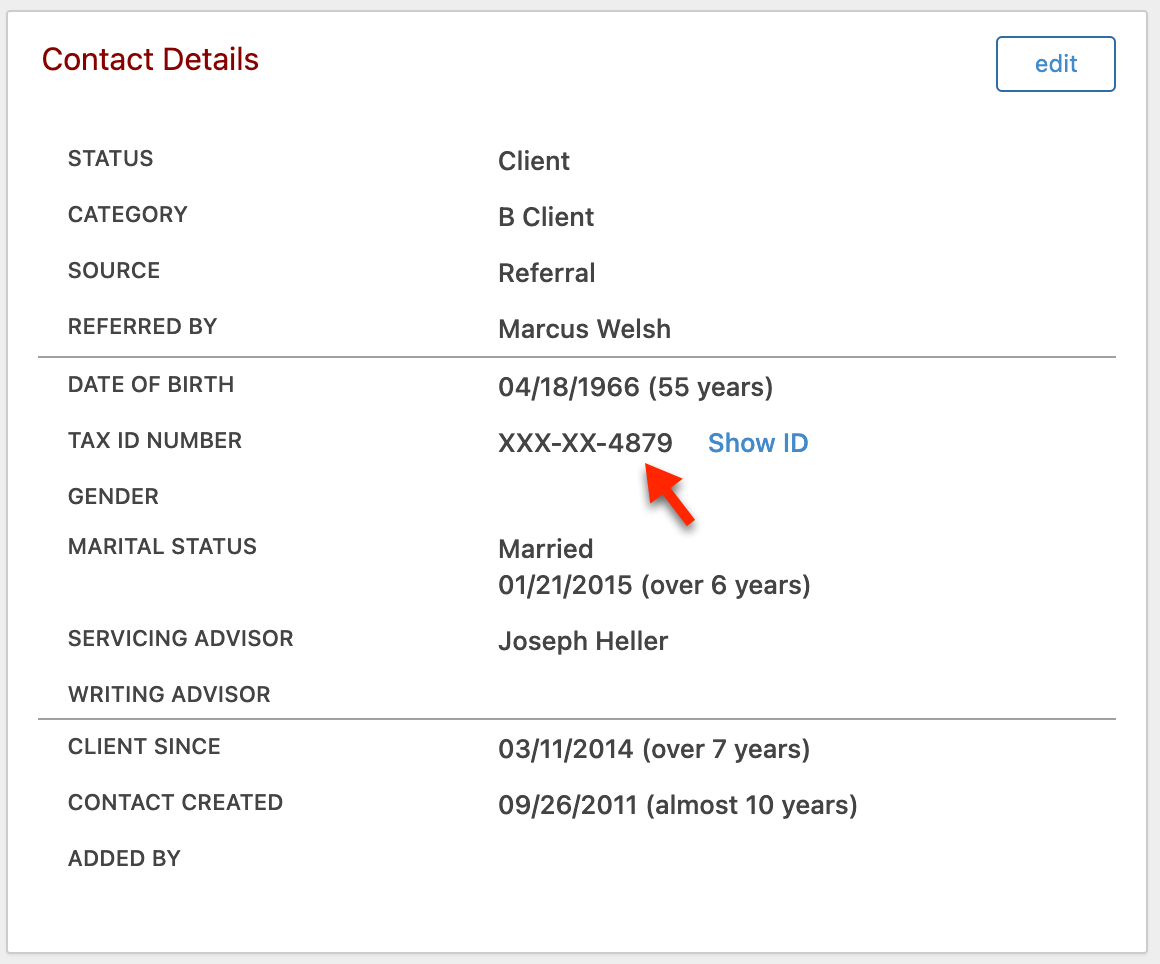
To override this preference and view the entire Tax ID number, simply click “Show ID” next to the four digits that are currently displayed. Note: as soon as you leave the page, the Tax ID number will revert to being hidden from view again.
Default Document View
Your options here are “CRM” or “Imaging”. If you are also a subscriber to Redtail Imaging, you’ll likely prefer that a contact’s Documents link take you to their Redtail Imaging area within the CRM by default:
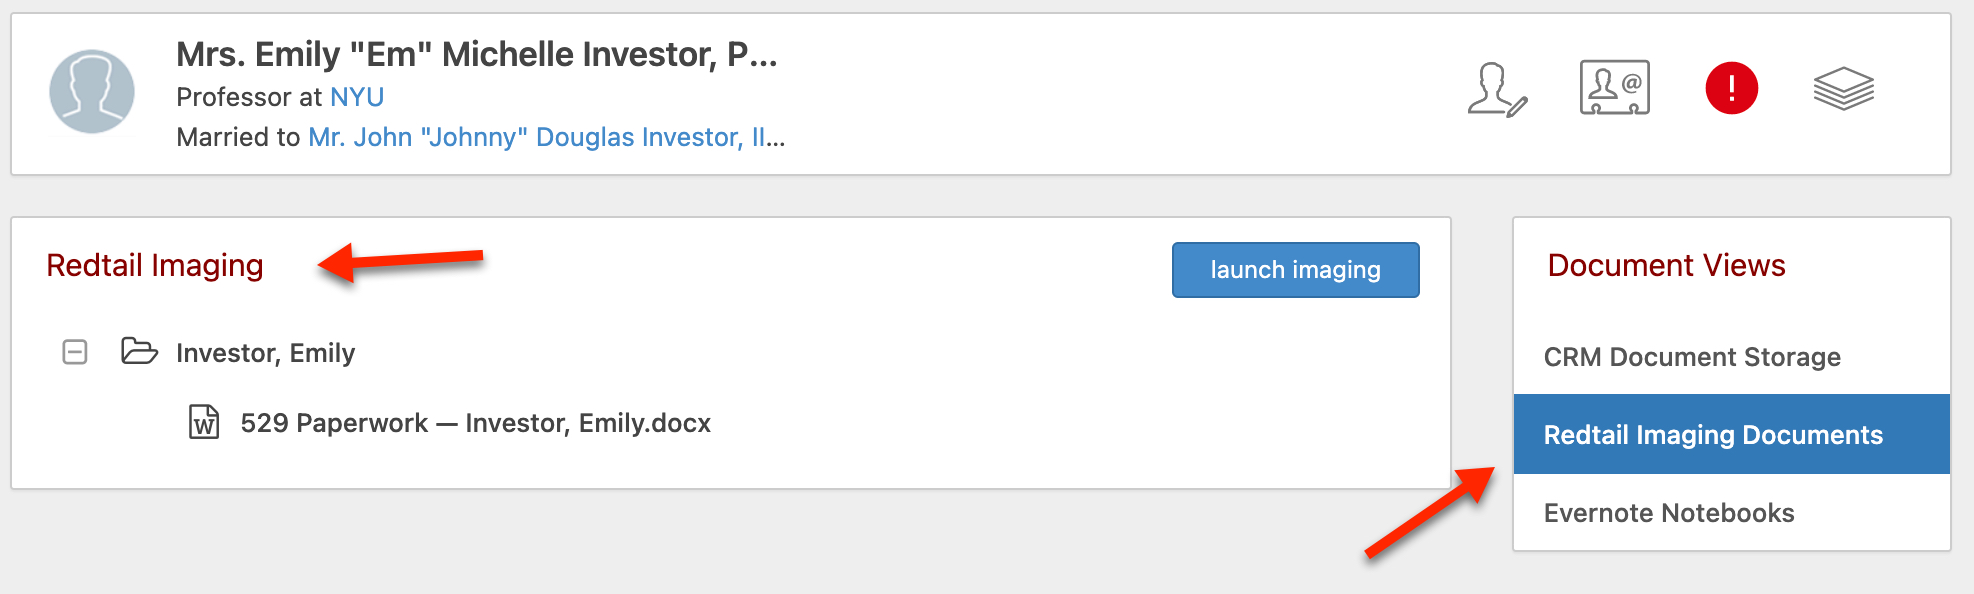
If you aren’t an Imaging user, or if you simply prefer to go to the client’s CRM Document Storage area, you can set that as your default preference. It’s quick and easy to switch between the two views in a client’s Documents area.
Default Note Category
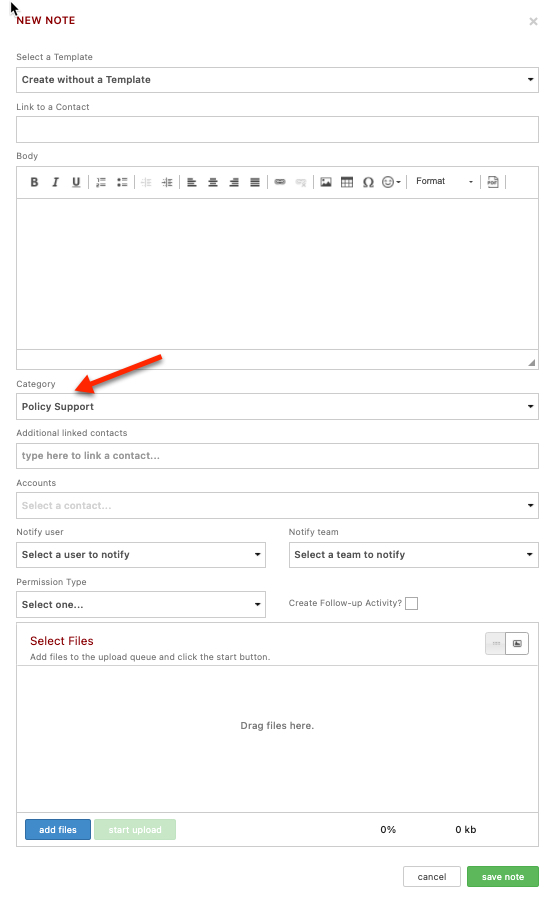
You can set your Default Note Category to a System Note Category or to any of the Note Categories that your office has created within your database. This preference controls the default Category that will pre-populate for any Notes you create within Redtail CRM. In the example Preferences above, this user has their Default Note Category set to “Policy Support”. So, when they go to create a new Note, they will already have that Note Category selected, as in the example below:
Maybe you’re unsure about what your best options for your default settings here should be. The great thing is you can revisit your Contact Record preferences at any time to make adjustments. But, since having a default Note Category in place can streamline your Note Creation process and save you a lot of time incrementally over the long run, it’s best to choose the default you actually use the most in order to achieve this particular efficiency.
So, if you’re uncertain about how you should set this default, we do have some suggestions that may help you get a handle on that:
- Visit your Notes by Contact Report. It isn’t tied to your Contact Record preference settings in any way, but it will allow you to get a quick historical view of the Note Category or Categories you use most frequently.
- Click the “filter” button for that report, where you’ll then see the below:

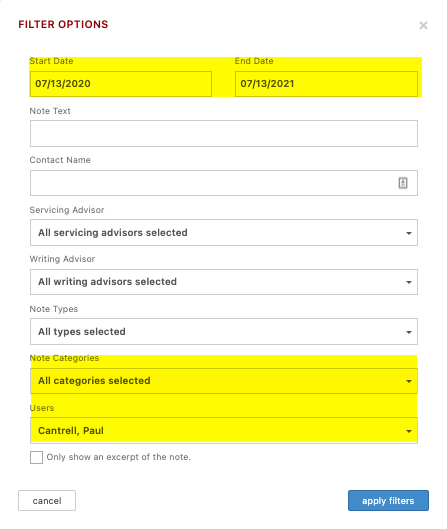
- In your Filter Options, set your Start and End Dates far enough apart so you can see a good representative sample of notes created over time. Depending on how much use you make of notes that date range will vary.
- Set Note Categories to “All Categories Selected” – this is so you can see all notes within your date range that meet the parameters established by your other filters.
- Set Servicing Advisors and Writing Advisors to “All . . . “ and Note Types to “All types selected”.
- Set Users to your name. Remember, this preference setting is for your login only, so it should reflect what your default settings should be.
- Then, click the “apply filters” button.
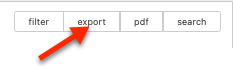
- After your Notes by Contact Report has refreshed to reflect your filter settings, you can then click the “export” button next to your “filter” button:
- This will download the data and allow you to open it up in Microsoft Excel, where you can then use Excel’s Data Sort capabilities to sort by your Category column to get a better idea of which one you may use the most. Note: you can sort the Notes in the Notes by Contact Report itself by clicking on the Category header. This may allow you to make a determination of which Category you use more of, but, if you have hundreds or thousands of notes in your report this will require scrolling through multiple pages of the report.
This method of determining how you should set your default Note Category preference should offer you some guidance. But, if you later feel like it should be different, it’s very easy to go back into your Preferences and make that change.
You can override your Default Note Category when creating a new Note simply by changing the Category of the Note. This won’t affect your Default Note Category preference.
Client Notes View

If your Client Notes View preference is set as in the example above, when viewing a client’s Notes page every type of Note will be visible by default. If you’d like to handpick which note types are on display by default, click the “change” option here and you’ll see the below, where you can make your preference selections:
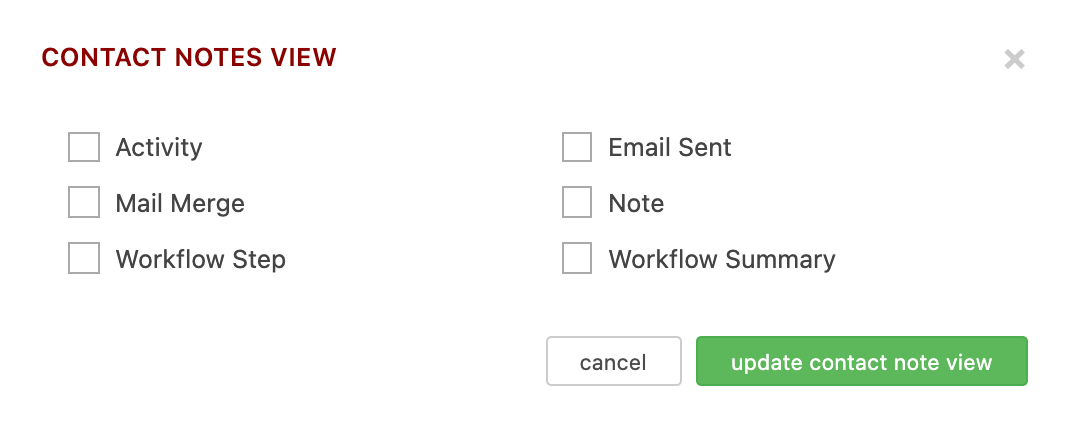
- Activity – if you would like completed activities to display in a client’s Notes by default, check this off. Included in the Note will be the Activity’s subject, notes (from the activity’s description field), start date, completed date, linked accounts, and linked documents.
- Mail Merge – when running a Mail Merge for a client, you have the option to indicate that you have done so within their record as a Note. Information included in that Note will be an indication you ran the mail merge, the mail merge template’s name, the database user who ran the merge, and any additional notes added when running the merge (the additional notes option pops up when you click “Save as Note”).
- Workflow Step – the Workflow Step note type is only applicable for users who had databases copied over from legacy versions of Redtail CRM (prior to Tailwag). Checking it off won’t affect your database one way or the other if this does not apply to you. If it does apply to you, you’ll see Workflow Step notes added prior to that switchover within a client’s Notes section when you have this checked off. For everyone else and for Workflow Step notes added after migrating from legacy Redtail CRM versions, you can access those Workflow Step notes from the Workflow Summary note -> Actions -> Step Notes path. You’ll then see a popup with all Workflow Step notes for the completed Workflow.
- Email Sent – when sending emails using Redtail’s internal email client, you have an option to “Save Copy as Note”. In those cases where you save a copy, those emails will display in a client’s Notes area by default if you have this Note Type checked off as a preference.
- Note – this is the default Note type, i.e., this type refers to actual Notes created within your database.
- Workflow Summary – if you have this Note Type checked off, a summary of completed Workflows will display as a Note on the date you complete them. Information included: the Workflow’s name, owner, target date, due date, completed date, and database user who completed the workflow.
You can override your Client Notes View preferences on a Contact Record when needed by clicking inside the “Types” box in the Note Filters area to the right of a client’s Notes, selecting the Type or Types you’d like to see, and then clicking “Apply”:
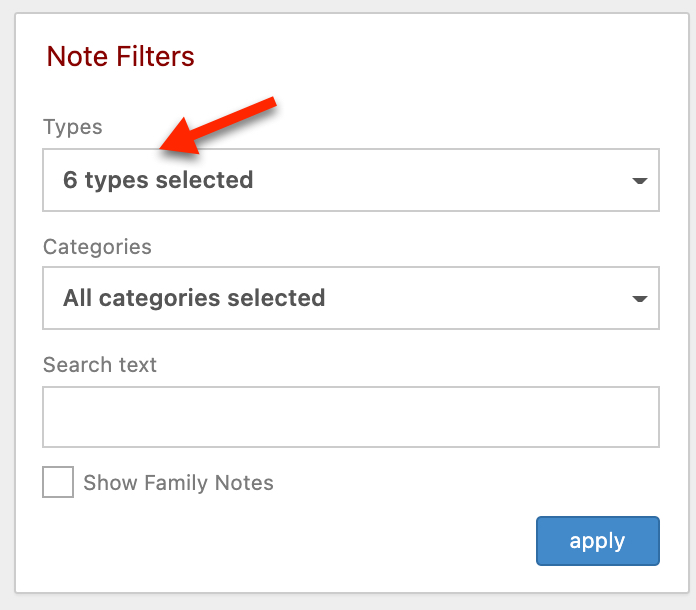
After you leave that page in the contact record, those filters will disappear and your preferences will be reverted to.
In our next Manage Your CRM series post, we’ll take a look at Notification Options preferences.
As always, if you have any questions along the way as we address these, you can reach out to our team at support@redtailtechnology.com or 800.206.5030. We are always happy to help you understand any aspect of Redtail CRM better so that you can better put it to use in your business!
