

You’ll then see existing Workflow Templates in your database (if any):
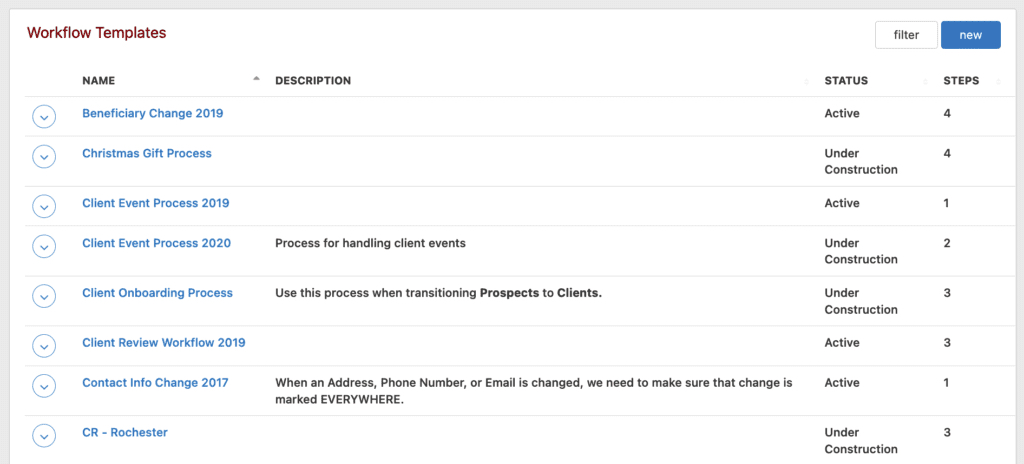
Note the “filter” and “new” buttons above your existing templates. The filter button will allow you to filter which templates are displayed based upon Template Name, their Status, and/or their Category.
To create a new workflow template, you would click on the button above in the top right corner of the Workflow Templates area that says “new”. You’ll then see an Add Workflow Template area:
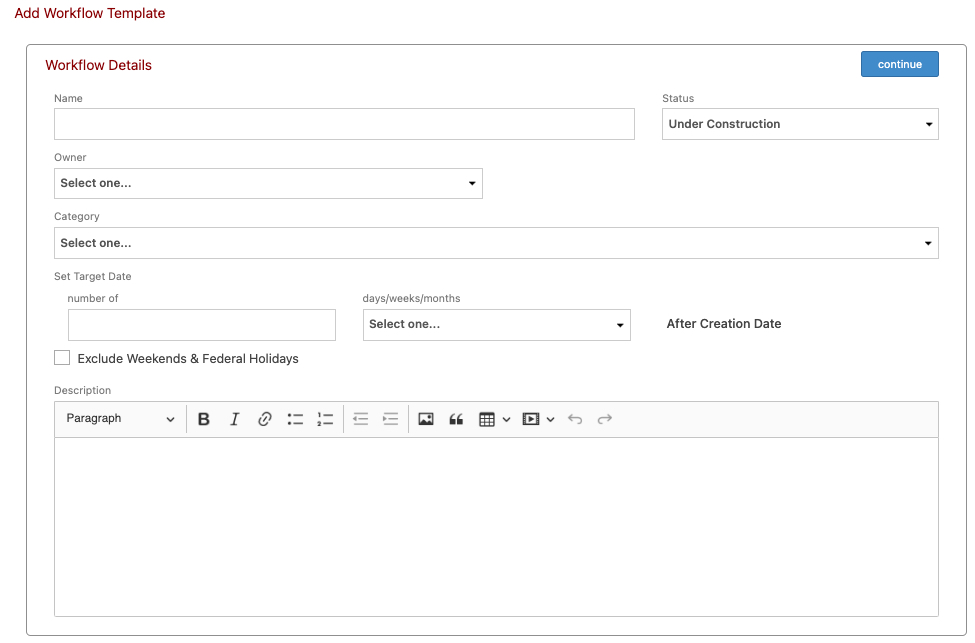
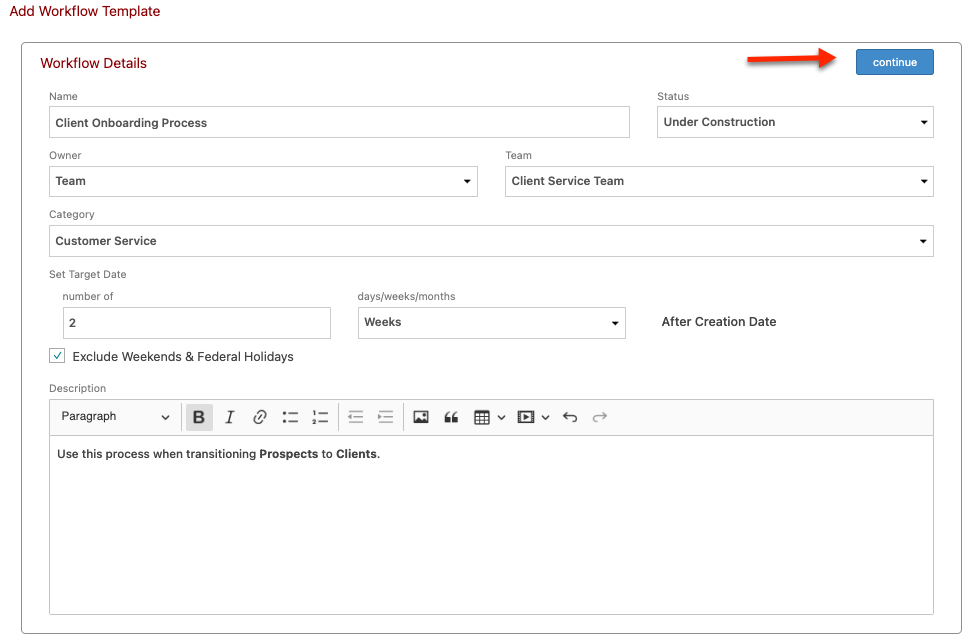
Let’s take a look at how you might go about creating an automated workflow process for handling the Client Onboarding Process. In the Name box above, you might type “Client Onboarding Process” to give your Workflow Template a name.
In the Status menu, you can then choose whether your Workflow should be Active, Inactive or Under Construction. By default, Workflows are set to Under Construction, so you’ll need to change this to Active once you’re ready to begin using your new Workflow. If for some reason in the future you want to make a Workflow temporarily unavailable (rather than deleting it), you can accomplish this by setting its status to Inactive. If it’s going to take you some time to set up your Workflow, you might want to designate it as Under Construction until you have all the pieces in place. This will also prevent other database users from attaching a Workflow that is not complete to contacts within your database.
For the Owner menu, select either a User, a Team, a Role or “Creating User” and, with the exception of that last option, the appropriate box will then appear for you to select the database user, database user team or database role that you would like to assign default Ownership for this particular template. If you select “Creating User”, the database user attaching the template at a later date will be the default owner and/or assignee for workflow tasks.
We’re going to assign this one to “Client Service Team” within our database.
In the Category menu, select the appropriate category that applies to this Workflow Process.
In the Set Target Date area, enter a number in the “number of” box and select days, weeks or months in the second box. This will establish how many days, weeks or months the Workflow should take for completion after it is attached to a Contact, Opportunity or Seminar. We’re going to set this at two weeks. You can check off “Excluding Weekends & Federal Holidays” so those days are not factored into your Target Date or Step Due Dates.
Then you might type “Use this process when transitioning Prospects to Clients” in the Description text box to serve as a description of what your Workflow Template is for. We recommend using the description field to provide information that would be clear to new users in your office who might be assigned taking over the Workflow at a later date. Detail and clarity in your descriptions may be helpful in cutting down on training time for others later. After entering all of this information, below is what you would see:
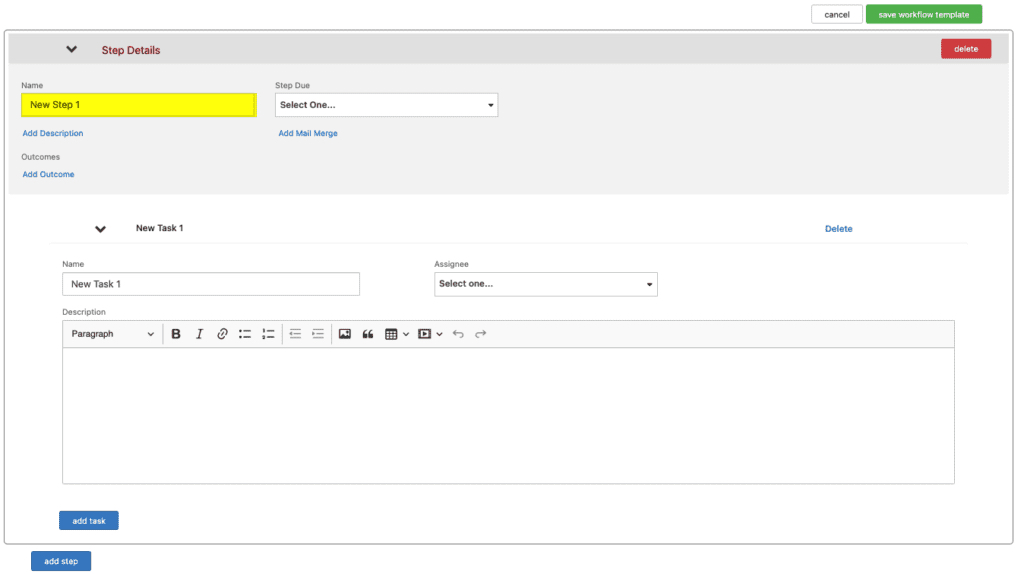
 Click the continue button to begin the process of adding Steps for your new Workflow Template. You’ll see the below (next to the Workflow Details box you just completed):
Note: above and to the right of your Step Details box you’ll see “cancel” and “save workflow template” buttons. “Cancel” will abandon the setup process for your workflow template without saving it. “Save workflow template” will save your work so far and exit out to your main Workflow Templates page. You can then click the Actions menu for your new Workflow Template whenever you’re ready to begin working on setting it up again.
In either case (whether you proceed to add steps from the start or whether you return to it later), let’s take a look at that process.
Before we go any further, we want to provide a little explanation for what we are about to do. We are going to add as many Steps as are necessary to set up the Workflow Template that we need for this particular process. For each Step, we’ll add all of the Tasks necessary to complete the Step. And, for some Steps, we’ll also add possible Outcomes. While Outcomes are not required, they are useful when a Step might have more than one possible Outcome. Note that if you do set up Outcomes for a Step, you must choose between them when completing the Step.
Now, back to our Client Onboarding Process. In the last screenshot above, you’ll see we have “New Step 1” highlighted. We need to give this a name to clarify what it is for. In order to do so, just click inside that box and type over the existing text with your first Step’s name. You can then proceed to set your Target Date.
In the example below (which we’ve already completed), you can see the Step Name, as well as when the Step is due in relation to the Target Date for the Workflow Template:
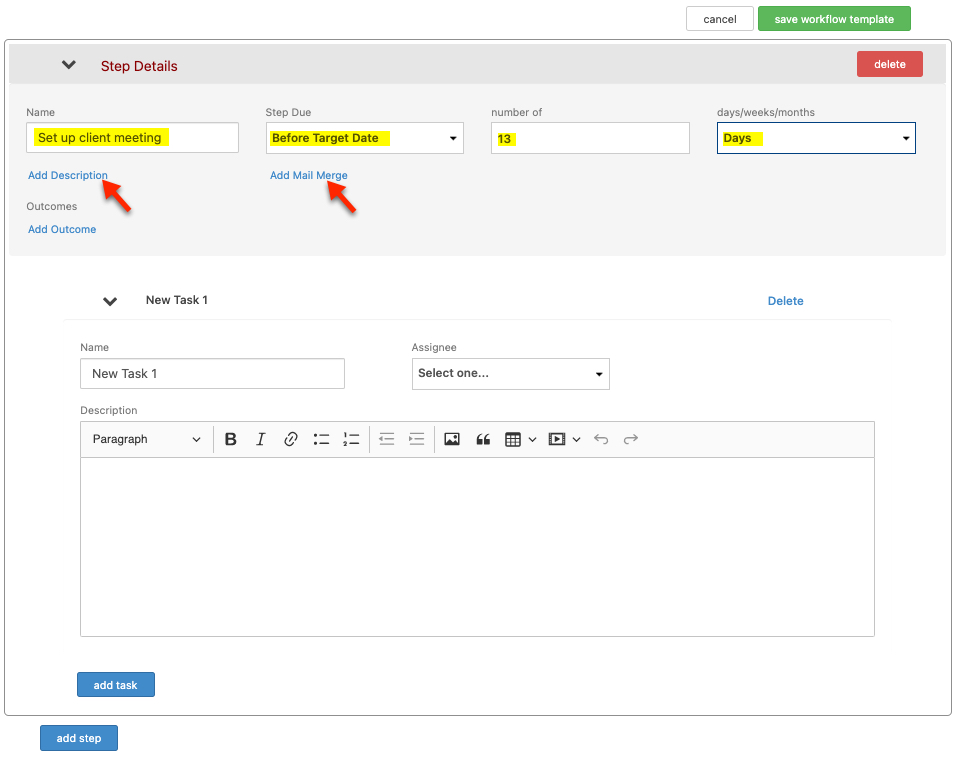
Here, we’ve given the Step a name that signifies the action to be taken and set up a Due date on which this Step should be completed (13 days before the Workflow’s completion Target Date). You can also add a Description for the Step by clicking the “Add Description” link and then typing in and saving that description.
Note: you can also select one of your Mail Merge templates to be a part of this particular Step in the Workflow, though we didn’t in this case. If you wanted to do so, click the “Add Mail Merge” link, select from the merge templates in your database, and click save.
We can also click “Add Outcome” here if there are multiple possible outcomes for a given step. You probably would need Outcomes for a Step like this, as you might be unable to reach the Client to set up the meeting, meaning that your possible Outcomes would either be A) the Next Step in the Workflow if you reached them or B) circling back to this Step if you have to try again. But, since we haven’t added any additional Steps to the Workflow Template as of yet, we’d need to do that before we can add the Outcome, as if we don’t we can’t select the Next Step for Outcome A. So, we’re going to go ahead and add multiple Steps and Tasks for this Workflow prior to talking more about Outcomes.
Let’s go back to view the Step Details for this first step:
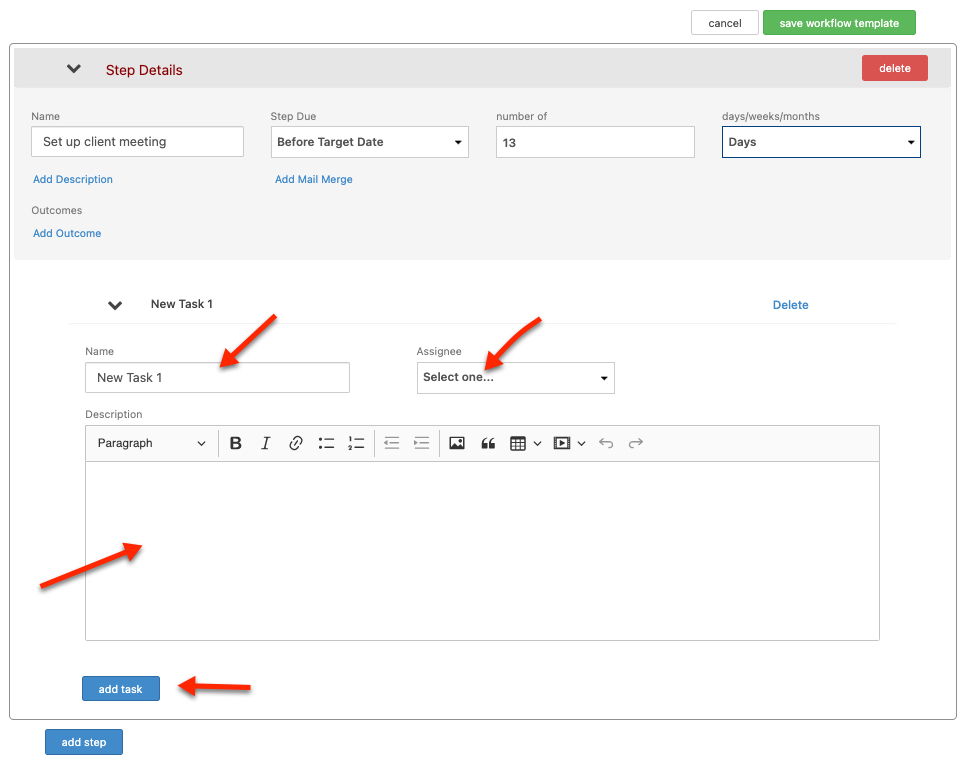
Above, we’ve indicated each of the areas you’ll use when creating the first task for this step. Below, you can see these same fields with data entered for each of them:
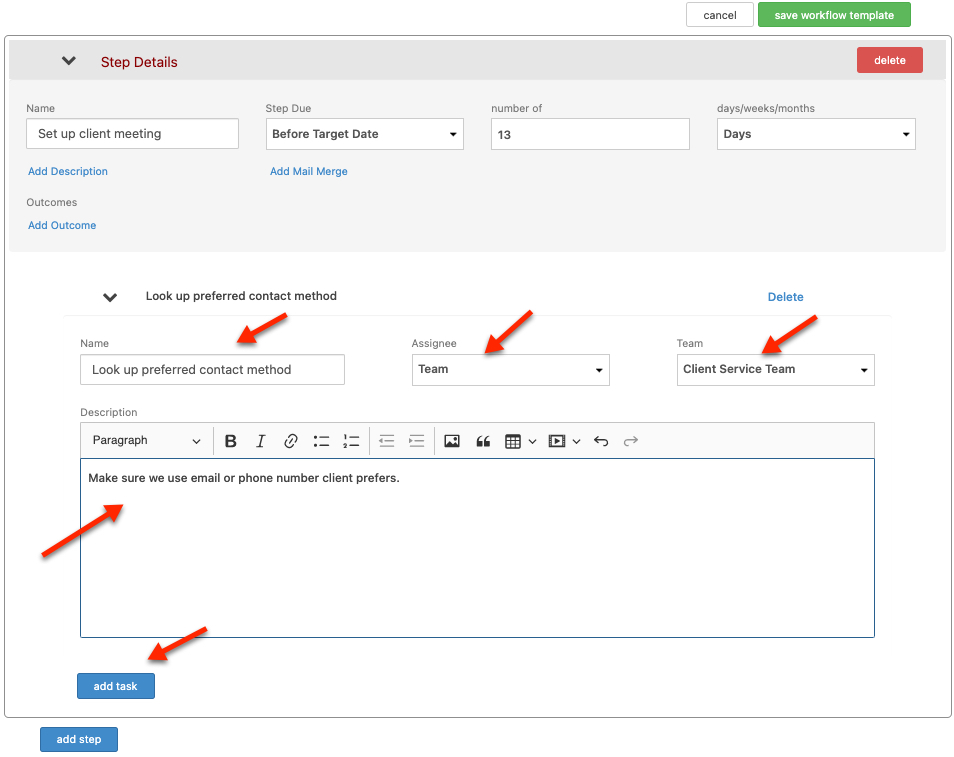
We’ve given the task a Name, an Owner (in this case a Team in our database called “Client Service Team”) and a Description. After clicking the “add task” button toward the bottom, we’d then see the page update like the below:
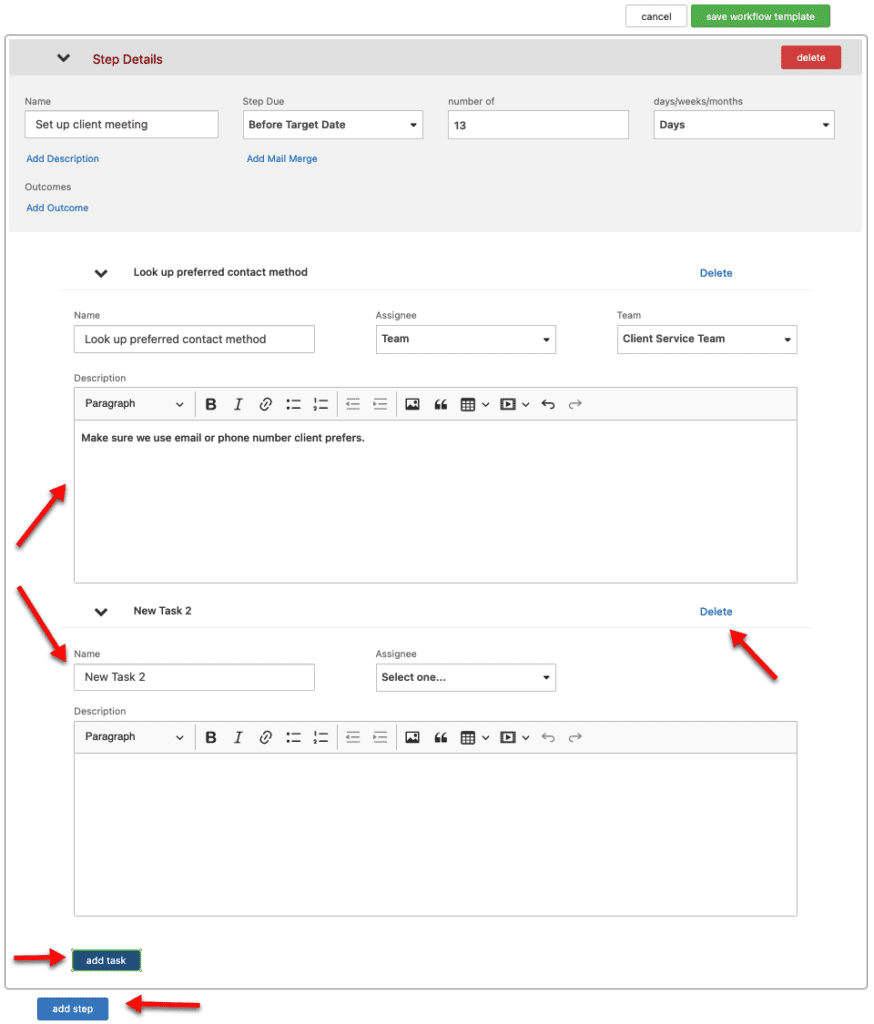
Now what we are seeing is our Step 1 information at the top, our Task 1 information that we’ve entered in the middle, and an opportunity to add more tasks for this step as well as altogether new steps at the bottom. We can continue on from here adding the rest of the Steps and their associated Tasks for the rest of our Workflow Template. Just remember: each Step must have at least one Task associated with it.
After adding two Tasks for this Step 1, this might appear as the below:
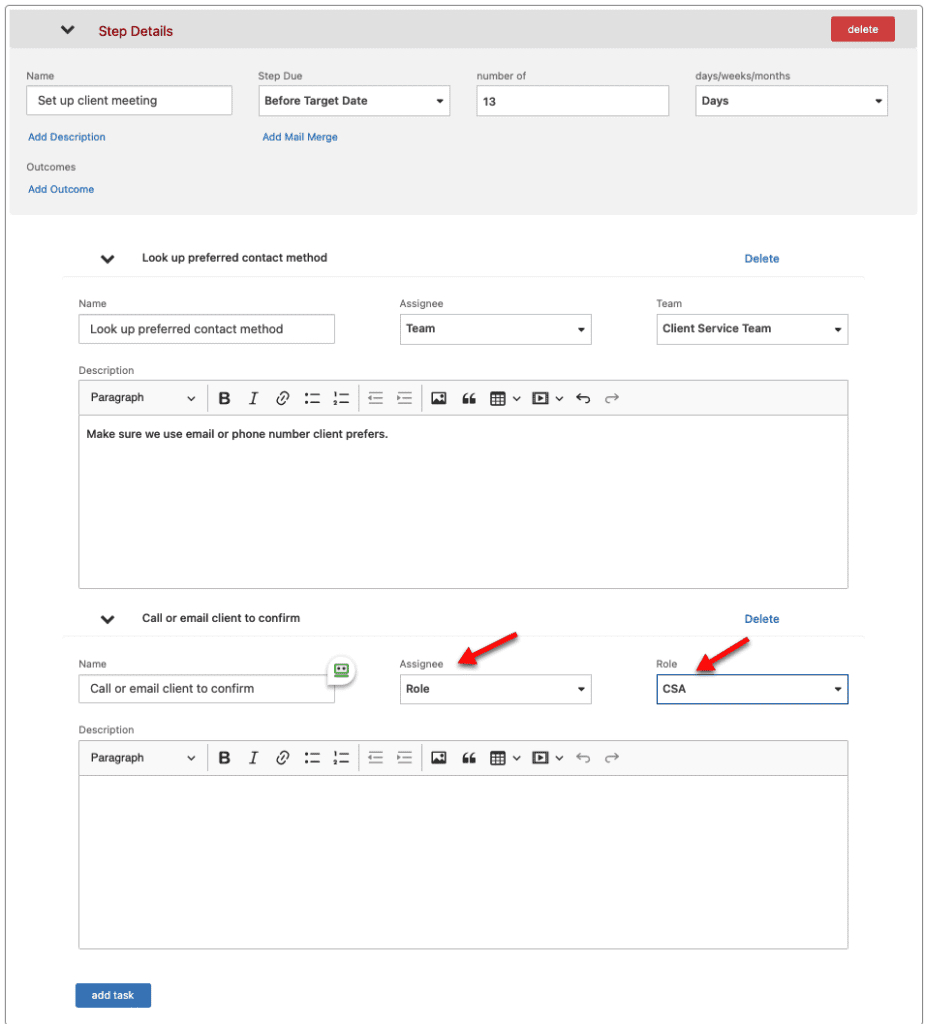
If you look in the Owner area, you’ll see that the first task is assigned to a database team. The second one is assigned to a database role (CSA). What this means is that whenever you attach this Workflow Template to a contact, that second task will be assigned to whomever has been assigned the role of CSA for that contact.
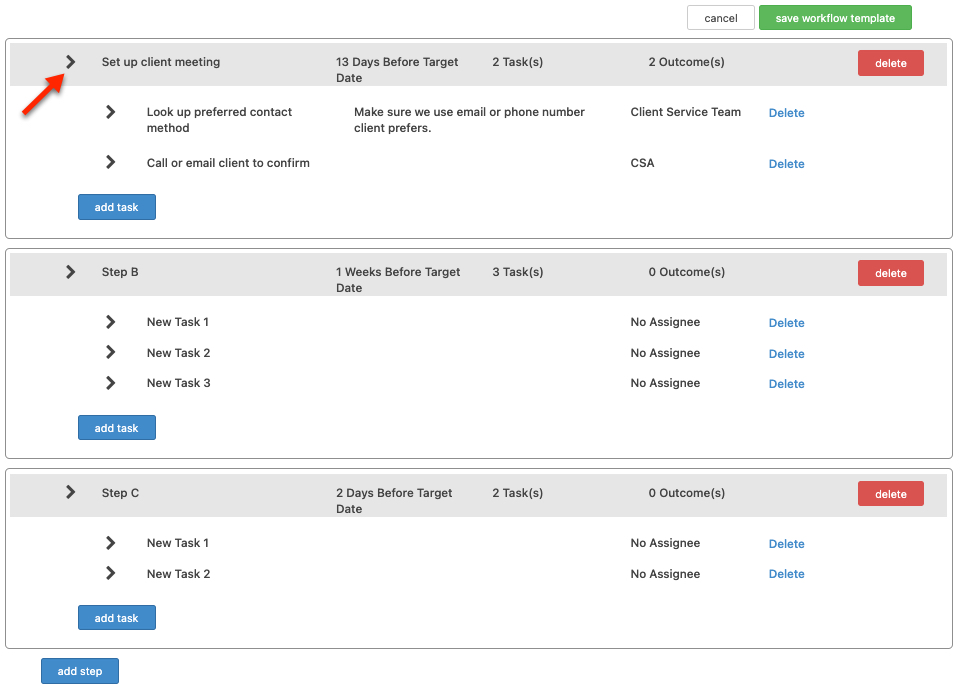
Now, we’re going to go ahead and add multiple Steps and Tasks for this Workflow, though we’ll only give them generic names for demo purposes. When done that might look like the below:
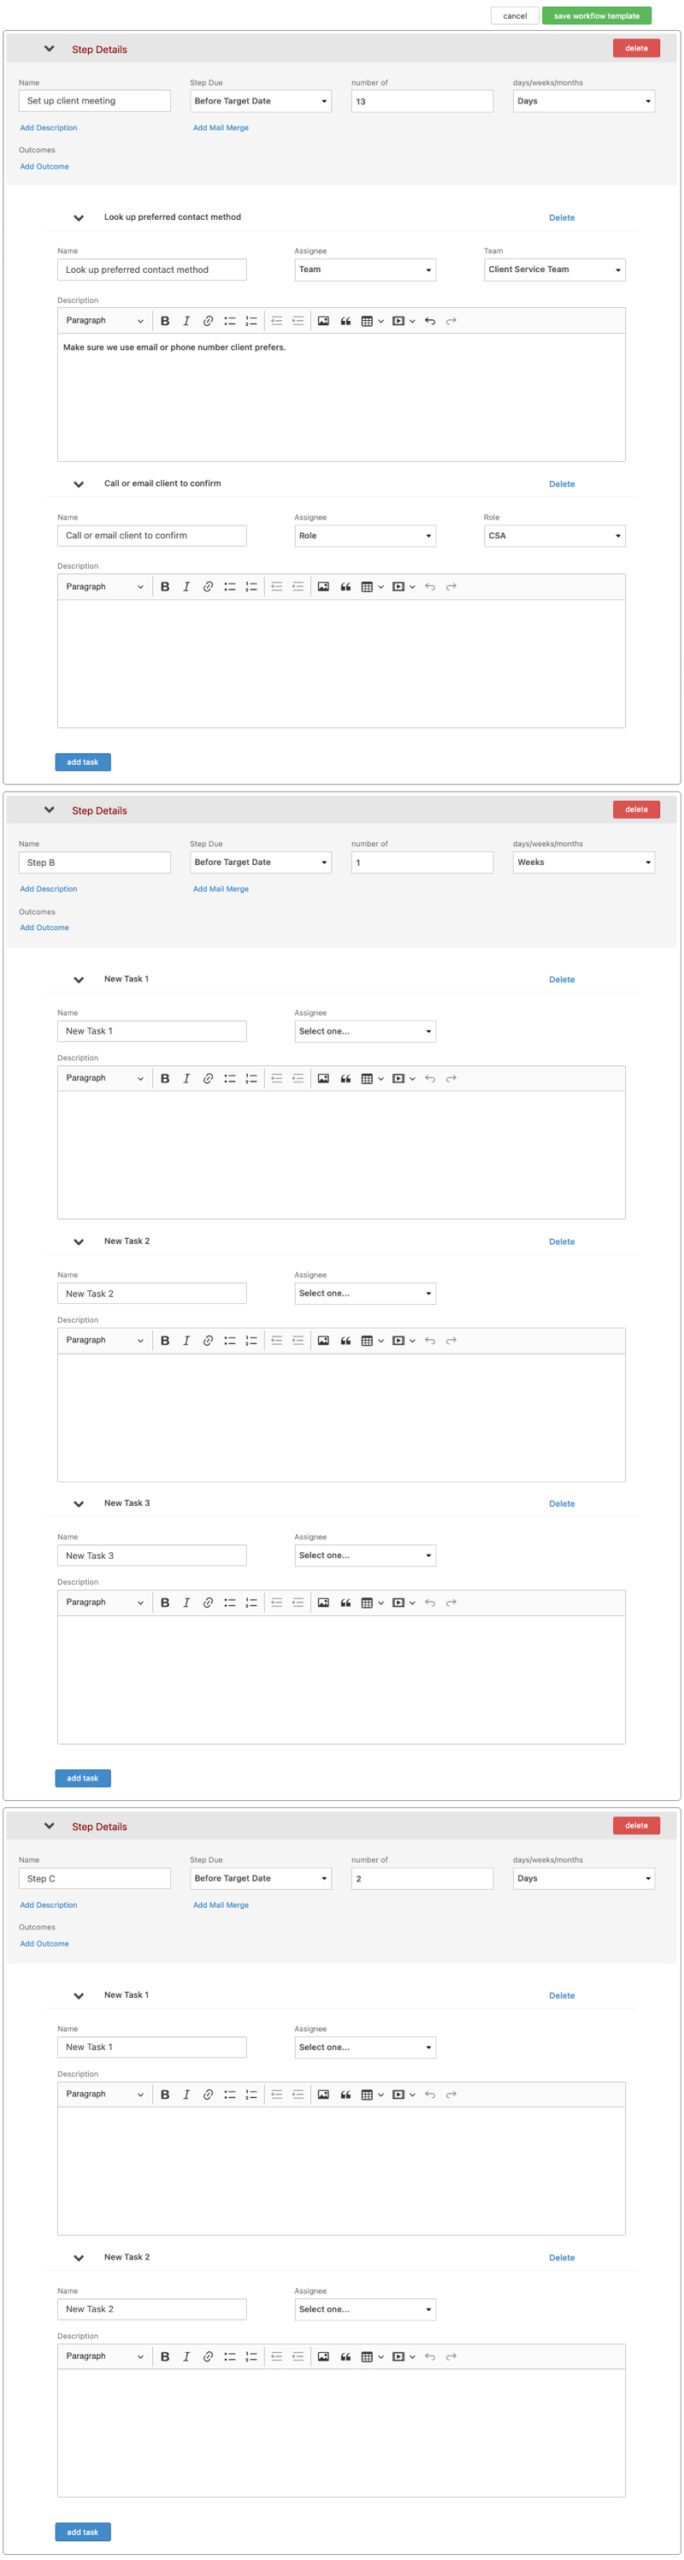
Now we have a Workflow Template with 3 Steps, the first and last of which each have 2 Tasks, the second which has 3 tasks. Let’s say we want to add Outcomes for Step 1. To do so, we’ll click the “Add Outcome” link for that Step and we’d see the below:
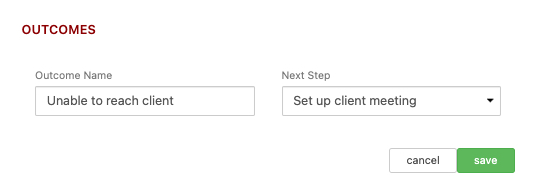 We’ve already completed the one above, indicating what happened in the Outcome Name field and the Next Step in its field. In this case, the outcome is that we were unable to reach the client to set up the meeting so our Next Step will be repeating this step again. Your available Next Steps in this field will always be the Steps that you’ve created for the Workflow along with an option to “COMPLETE WORKFLOW”. Just click the “save” button to add the outcome for the step.
You’d then add a second outcome for what occurs if you are successful in setting up the meeting. Since we only used generic names for the rest of the Steps in this Workflow Template, we’ll say that the Next Step were this to happen would be Step B. After adding both of these possible Outcomes (and you can have more than two), this Step would look like the below:
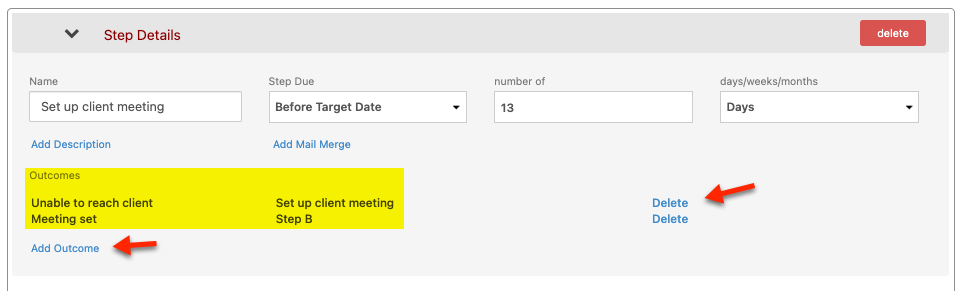
In the highlighted area above, you can see that two possible outcomes now exist for the step along with what happens in the Workflow next should you select one of those outcomes. You can also see that you can add additional outcomes for the step in the future or delete any previously established outcomes should the need arise to.
Four final items to note here about setting up your Workflow Templates:
1. A directional symbol appears next to each Step and Task in your Template when you hover your cursor over that Step’s or Task’s header row:

You can click, drag and drop these to rearrange the order of your Workflow Template Steps and/or Tasks, should that be necessary.
2. To the right of that directional symbol and available for every Step and Task regardless of whether or not you are hovering over its header, you’ll see a marker pointing down (as in the example above) or to the right. The purpose of this marker is to allow you to collapse (or expand) a Step’s or a Task’s details for less distraction on the page when working in a given area. You’ll know a Step’s or a Task’s details are collapsed when that marker is pointing to the right, as they all are in the example below:
3. Once you have set your Workflow Template to Active, you can begin attaching it to individuals, groups of contacts, Opportunities or Seminars for use.
4. Workflows are process driven. When you assign a workflow with multiple steps, you will only see the current process step pending completion. The rationale behind this is that with workflows the result of each step determines what needs to be done next.
Additional Workflow Resources
Below are links to some more resources we’ve put together to assist you when working with Workflows in Redtail CRM:
How to Restore Deleted Workflow Templates
How to Clone Workflow Templates
How do I Attach Workflows to Contacts in Bulk
In our next Manage Your CRM series post, we’ll take a look at Managing Database Account Lists in Redtail CRM.
As always, if you have any questions along the way as we address these, you can reach out to our team at support@redtailtechnology.com or 800.206.5030. We are always happy to help you understand any aspect of Redtail CRM better so that you can better put it to use in your business!
2016-OAT-10/25/2022
