
Redtail CRM offers subscribers a ton of opportunities to customize their CRM, both at the individual and at the database level. These opportunities for customization are important because they allow you to set your database preferences and lists up in ways that work the best for both you as an individual as well as for your office. Taken together, these customization options will help drive user adoption and, ultimately, help you streamline your processes while at the same time personalize and improve the client experience your firm provides.
You can browse all prior posts in this series here. In this post, we’ll take a look at how you can manage Broadcast Emails and Email Templates.
Within Redtail CRM, you have the option to bulk send the same email message to multiple contacts at one time, with those emails being sent individually rather than to groups or as CC or BCC emails. Within Redtail these are called Broadcast Emails.
In order to send Broadcast Emails from Redtail CRM, you must first set up your Email Preferences in order that these messages can be routed through your email host for successful delivery. You can see an earlier installment in this series for a walkthrough of setting up these preferences.
You should also be aware that you can establish Email Templates within Redtail CRM to save time on those communications where much of the information to be included in the email will be used again and again.
Here, we’ll first take a look at how you go about establishing your Email Templates. We’ll then turn to the process for sending and managing Broadcast Emails.
Setting up your Email Templates
You can set up Email Templates within Redtail, allowing you to type up an Email once and then use it as a time-saving starting point going forward for individual or broadcast emails.
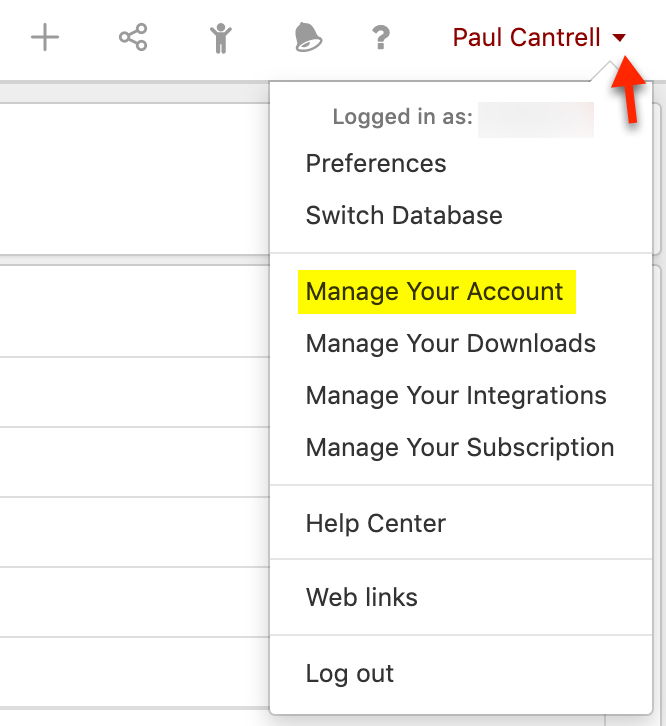
To begin setting up an Email Template, select Manage Your Account after clicking your Name from the Top Right Menu within Redtail:
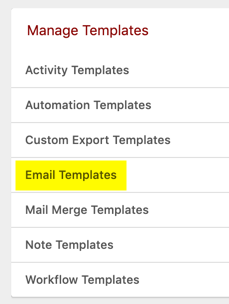
Then, click “Email Templates” in the Manage Templates area:
You’ll then see existing Email Templates in your database (if any):

Click “New” and you’ll arrive at the modal where you can begin setting up your Template:
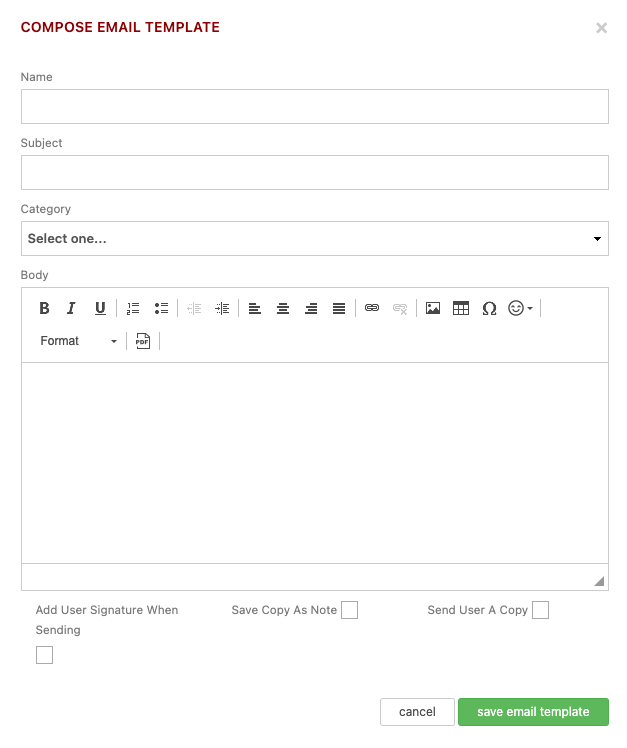
- Name – whatever you enter here will serve as the name of the email template. This will not be visible to your recipients, but when selecting between templates, their Names are what you will see, so make them
descriptive enough to make this choice clear. - Subject – this will serve as the subject line of the email, and as such it is a field that you should take your time with in hopes of improving the open rate for your emails.
- Category – choose from one of your CRM’s system or custom Categories, if you’d like to categorize your Email Templates. Note: there is a “filter” option above your Templates that will allow you to filter which
Email Templates you are viewing by Category, should you desire. - Body – this is where you type the body of your email message. You have a formatting bar above the Body that allows you to insert Images or tables and use a number of other formatting options.
- Add User Signature When Sending – if you check off this option for your template, your signature will automatically pull from whatever you’ve set up for your signature within your Site Preferences.
- Save Copy as Note – if you check off this option for your template, a copy of the email will be saved as a Note on the record of all recipients to whom the email is delivered.
- Send User a Copy – if you check off this option for your template, you will receive a copy of the email each time you use it.
Also, you have the ability to personalize your Broadcast Email Templates through the use of acceptable Email Merge Fields in the Body of your email. Below is a list of those acceptable fields:
##Firstname##
##Lastname##
##Middlename##
##NicknameFirstname##
##Salutation##
##Suffix##
##SpouseFirstname##
##SpouseNicknameFirstname##
##Name##
##Familyname##
As an example, if you wanted your email template to begin with “Dear” as a salutation followed by the first and last name of your contacts, you would enter the following above the rest of the body of your message:
Dear ##Firstname## ##Lastname##,
Then, all of your emails using this template would be addressed to each client using their First and Last Names.
Once you’ve made your entries here, you can click Save Email Template at the bottom and you’re ready to begin using the template.
Let’s go back to your Email Templates screen and look at available actions from that page:
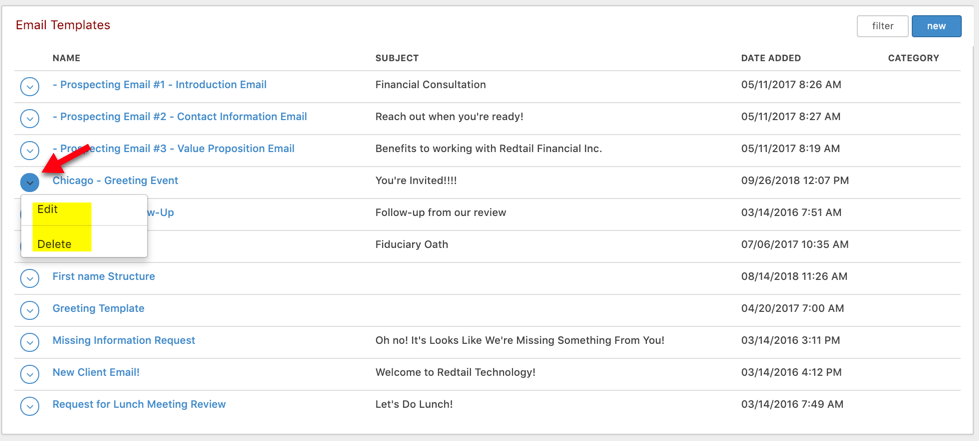
As you can see above, if you click the Actions icon for an Email Template on this page, you can Edit or Delete the template. If you choose the Edit option, you’ll see the same modal that you saw above when adding a new one – of course, it will already be completed. You’ll just need to make any necessary changes and save the template to complete those edits.
Sending Broadcast Emails
Let’s now take a look at how you go about sending out a Broadcast Email (accessible from the Contact Options —> Bulk Actions menu on the Advanced Search page in Redtail CRM after running your search, or sending QuickLists, Tag Groups, or other contacts to your Advanced Search page):
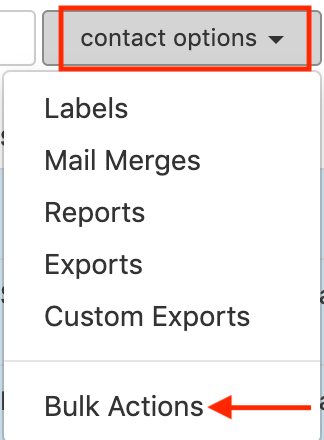
After you have selected the group of Contacts you want to include in your Broadcast Email from the Advanced Search page, you can then click the Broadcast Email option that appears after clicking Bulk Actions, as indicated above:
This will open a Compose Broadcast Email dialog for you to begin composing your message:
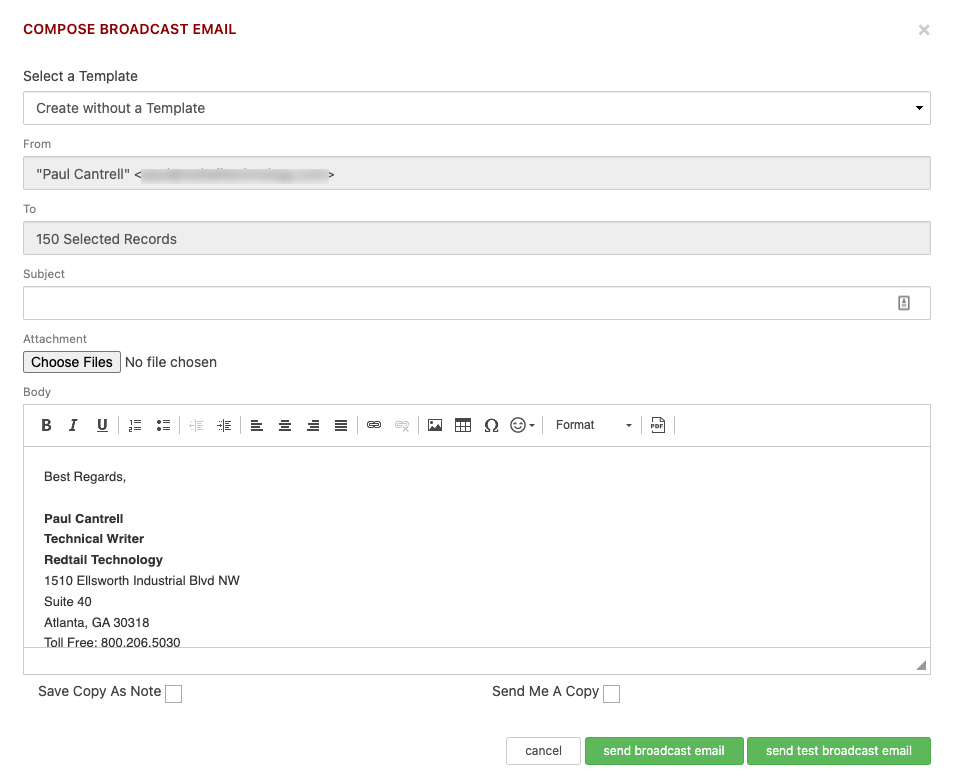
1. Select a Template – this allows you to select an Email Template from your database to use for the Broadcast Email. We covered how to set these templates up above.
2. From – The From field is the email address that will be displayed to the recipients of your Broadcast Email. You can set this up under Manage Your Account —> Change Site Preferences in the Email
Options section in the SMTP Username field. Details are here.
3. To – The To field indicates how many records you selected on the Advanced Search page to include in your Broadcast Email.
4. Subject – Whatever you type in the Subject line will show up as the Subject of the Broadcast Email for your recipients.
5. Attachments — you can click Choose Files to then browse your computer or network for files to attach to your Broadcast Email:
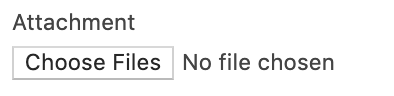
Please Note: Files must be 3MB or smaller to attach to Broadcast Emails. Also, you can attach more than one file but they must be stored in the same location on your computer so that you can attach them at the same time. Otherwise, when you browse to find/attach an attachment stored elsewhere, it will replace those you’ve already attached.
6. Body– The Body area of your Broadcast Email is where you can create the message you would like to send:
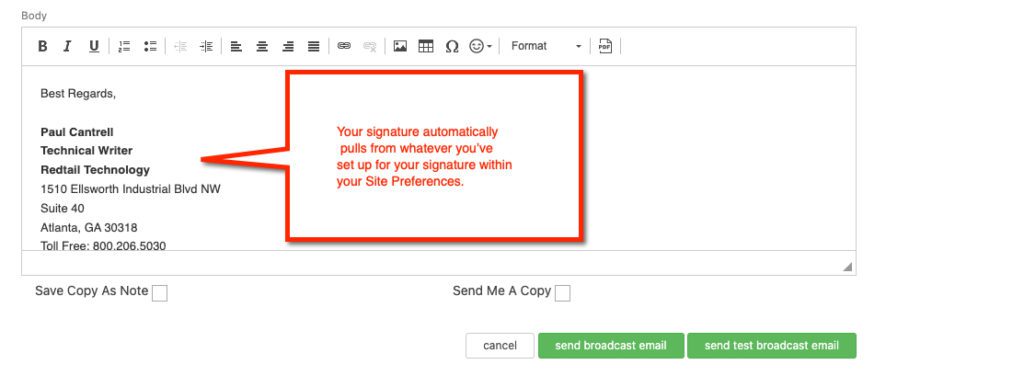
Note that above the text box for entering your message you are provided with some common formatting tools. You can use these tools to format any of the text you enter into your Message Body.
Additionally, you have the ability to create a standard signature to use in all Broadcast Emails under Manage Your Account –> Change Site Preferences –> Email Options in the Email Signature field. Once you have set up an Email Signature there, it will automatically populate your Broadcast Emails. Details are here.
Also, you have the ability to personalize your Broadcast Emails through the use of acceptable Email Merge Fields. Those fields were covered above in the section on setting up your Email Templates.
As a last note about composing the body of your Message, you can insert images into your Broadcast Emails, as long as the image is available on the web somewhere which will allow you to link to it. To include an image:
- Prepare the rest of your message in the Broadcast Email window.
- Locate the image on the web, wherever you have it stored. Right-click on the image and select the option that allows you to copy the URL for the image itself. Depending upon where the image is, this might be accessible by selecting Properties after right-clicking. Once you’ve located the URL for the image, copy that URL.
- Then, within your Broadcast Email, click the Insert Image button in the toolbar:
 This will open up an Insert Image modal, where you can then copy the URL for the image you want to include:
 - Enter the URL for the image in the highlighted area above – you should then see a preview of it in the Preview area above. Then click the OK button.
 This will open up an Insert Image modal, where you can then copy the URL for the image you want to include:
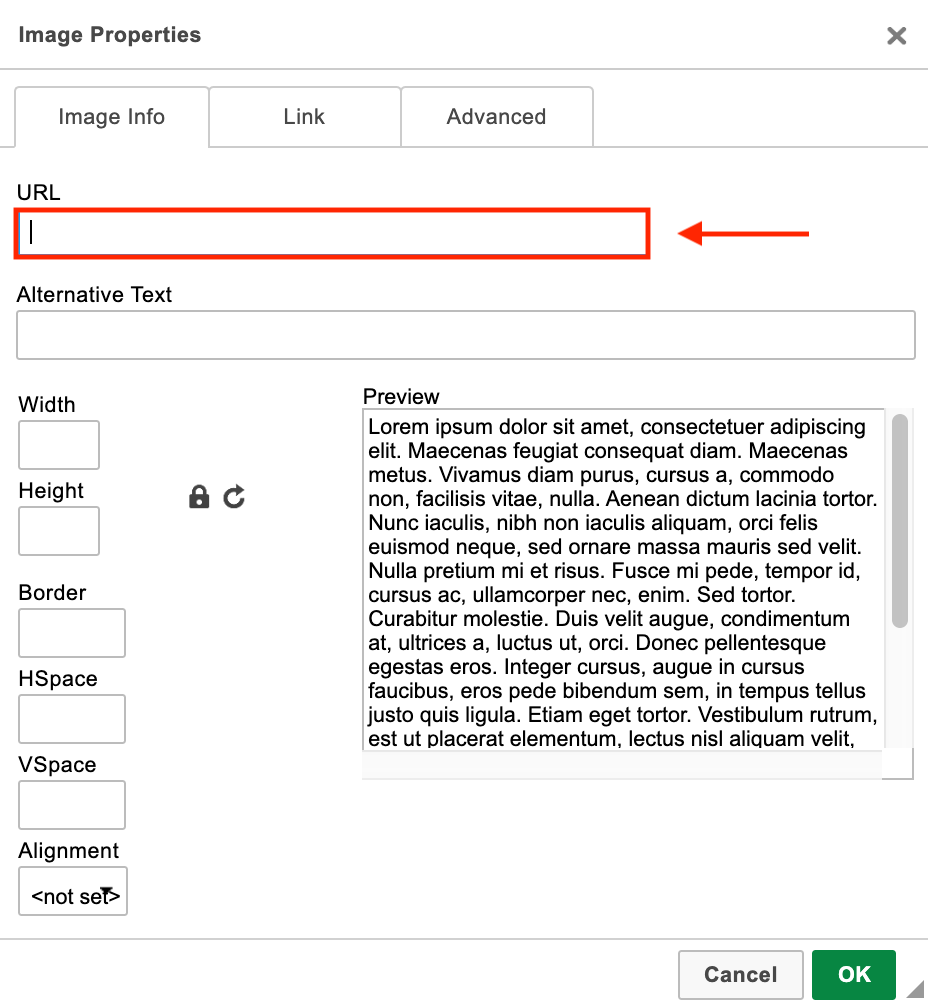
7. Send Broadcast Email – Note that there are two selection boxes and three buttons here: Save Copy as Note, Send Me A Copy, Cancel, Send Broadcast Email and Send Test Broadcast Email:

If you select Save Copy as Note, your Broadcast Email will be saved to each contact record to whom it is sent as a Note.
If you select Send Me A Copy, you’ll also receive the Broadcast Email.
If you click Cancel, you will be returned to your Advanced Search results and no Broadcast Email will be sent.
If you click Send Broadcast Email, your email will be sent to all recipients on the list that have an Email address marked “Primary” within their record.
If you click Send Test Broadcast Email, a copy of the Broadcast Email will be sent to your email address w/o sending to everyone else on this list. This is always a good idea as it allows you to proof the final look of
your Broadcast Email prior to sending it to everyone on your list. Note: you won’t lose your work if you send yourself a test. You can carry on from this same place after doing so.
These are the basics of creating and sending Broadcast Emails within Redtail.
Managing Broadcast Emails
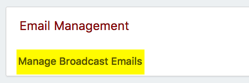
Now, let’s take a quick look at managing your Broadcast Emails within Redtail CRM. To access the area where you can do this, select Manage Your Account:
Then, select Manage Broadcast Emails from the Email Management area:
From there you can check the status of both pending and completed Broadcast Emails you have sent from your database. After clicking Manage Broadcast Emails, you’ll first see any pending Broadcast Emails (meaning those which have been queued for delivery, but have not yet completed – typically there won’t be any jobs here unless you are currently in the middle of sending a Broadcast Email):

In the above case, there is one Broadcast Email job pending. If you want to see Completed jobs, simply click the Completed tab next to the Queued tab, at which point you’ll see any Broadcast Emails sent over the past 30 days.
What you’ll see for both Pending and Completed jobs are eight columns:
- Sent On — displays the date and time the Broadcast Email was sent.
- Subject — displays the Subject Line of the Broadcast Email.
- Processed — displays the number of emails that have been processed in the job to that point.
- Succeeded — displays the number of emails that were successfully delivered.
- Failed — displays the number of recipients whose Broadcast Emails were not delivered successfully.
- Total — displays the number of all intended recipients (Succeeded number plus Failed number).
- Status — displays the status of the job, followed by the Processed Count number over the Total Count number).
- Updated At — displays the date and time of last update for the job. On the Completed page, it will likely be the same as the Date Sent column, though it may not always be the same for larger jobs.
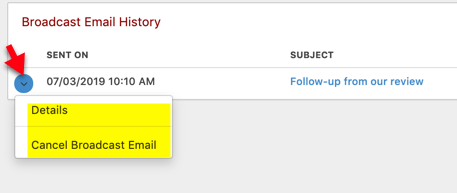
The Actions Menu to the left of each Queued Broadcast Email provides you with an option to view details for the email or Cancel the email:
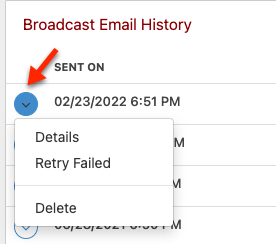
The Actions Menu to the left of each Completed Broadcast Email provides you with an option to view details for the email, retry a send if the previous attempt failed, or delete the email:
If you click the Details option for one of your completed emails, below is an example of what you might see:
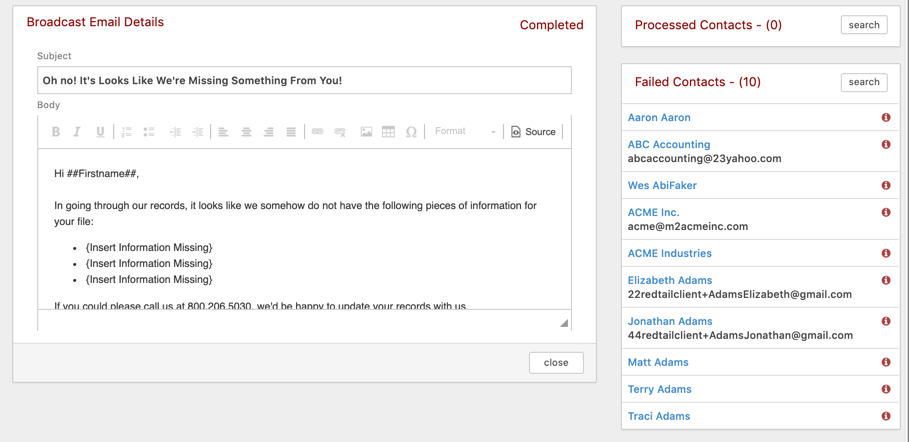
First, you’ll see the Subject and Body of the email itself. To the right of that, you’ll see:
- Processed Contacts – in the example above, that number is 0. If any of the emails had been successfully sent, you’d see that number here, with those contacts listed below (as they are in the Failed Contacts section beneath). Clicking the “search” button next to Processed Contacts would send any contacts from the Processed Contacts to your Advanced Search page.
- Failed Contacts – in the example above, that number is 10. You can send those contacts to your Advanced Search page by clicking the “search” button next to Failed Contacts. Clicking a contact’s name in either of these two areas will take you to their Overview page. Hovering over the red information icon in the Failed Contacts area will display a tooltip as to why the email failed to send to them (most likely they don’t have an email address marked “Primary” on their contact record, which is the email address Broadcast Emails send to).
In our next Manage Your CRM series post, we’ll take a look at Managing Activity Templates in Redtail CRM.
As always, if you have any questions along the way as we address these, you can reach out to our team at support@redtailtechnology.com or 800.206.5030. We are always happy to help you understand any aspect of Redtail CRM better so that you can better put it to use in your business!
